There are hundreds of ways to put a hole in something. Choosing the right way not only means you get the right hole in the right place, but you get it done with the least amount of trouble without damaging the material, your tools, or yourself.
Just about any material can be drilled, but what you’re drilling has to coincide with the bit you’re going to use. Softer materials can be drilled safely with most bits, but hard or brittle materials like glass, concrete or acrylic might required specially designed drill bits. Accuracy and finish can affect your choice of bits, as they all differ. Some are designed to produce accurate, clean holes while others are rough, fast but cheap. The last big choice is the type of drill you will use.
Virtually all drill bits are made to spin clockwise. Also make sure the shank of the bit (opposite of the cutting end) will fit in your drill chuck. Chucks come in 1/4″, 3/8″ and 1/2″, which is the maximum diameter of shank that will fit inside. 3/8″ is a good general purpose size, and most large drill bits have reduced shafts to fit in a 3/8″ chuck.Shank commonly come in round or hexagon shapes. Round shanks centre more reliably than hex, but hex shanks are less likely to slip, which makes them a better choice for drilling hard, thick materials.
Before you start drilling, be sure to fully tighten the bit in the chuck and make sure it’s straight, otherwise you’ll end up breaking the bit. The quickest way to check if it’s straight is to run the drill without actually drilling a hole. The bit should stay straight as it spins and not wobble or make a blurry cone. If you’re sure it’s chucked right, but it gives you one of these issues, the bit might be bent and should be discarded.
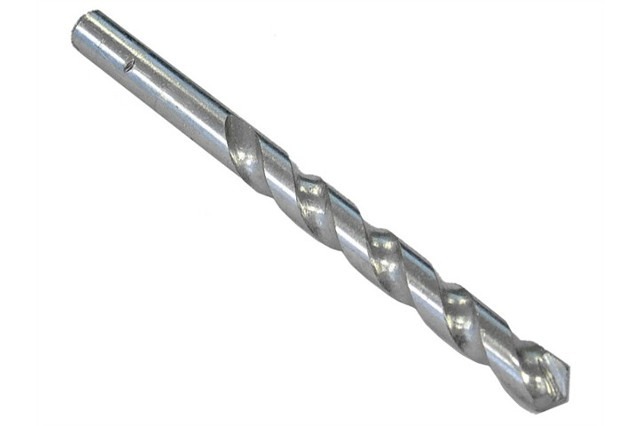
Twist
This is the most common type of drill bit and the most versatile. It has a pointy end and a spiral groove to help carry chaff out of the hole. They’re so popular because they work on a wide range of materials and come in sizes of a fraction of a millimetre up to multiple inches. The main difference between them is the quality and coating of the steel. From the softest to hardest are Steel, High Speed Steel, Carbide Tipped, and Cobalt Steel. Harder bits are not only better at drilling through harder materials, but will stay sharper for longer when drilling softer materials. Plain steel bits are really only useful for drilling soft woods. Cobalt steel bits are heat resistant and particularly well suited for drilling hard metals, though they are brittle and should be handled carefully.
Bits often have different coating to improve their performance. Black oxide serves as a lubrication and rust prevention coating. Titanium coatings improve the hardness and heat resistance of bits. However coatings are thin and once they’ve worn off, you’ll just have an ordinary bit. Sharpening them just destroys the coating, and they’ll return to their original performance.
The points of the bit is available in two styles. Spade points are the most common and requires it to be pressed into the material before it starts to drill. On hard materials like metal this can mean your drill will skate around before making a hole, which often puts the hole in the wrong place. This can be avoided by using a centre punch or drilling a pilot hole to mark the hole, but split tip bits reduce wandering and eliminate the need to punch or drill a pilot hole.
When you’re drilling deep holes in soft materials, pull he bit out and clear the flutes regularly. Otherwise the flutes get packed with chaff, get heavy and stop cutting.
Pros:
- Good in just about any material.
- Common and usually cheap.
- Can be sharpened when dulled.
- Available is just about any size.
Cons:
- Small bits and fragile and break easily.
- Large bits are very expensive.
- They dull quickly in certain materials.
- Small flutes mean they can fill with chaff when drilling soft material.
Used for:
- Most general purpose drilling.
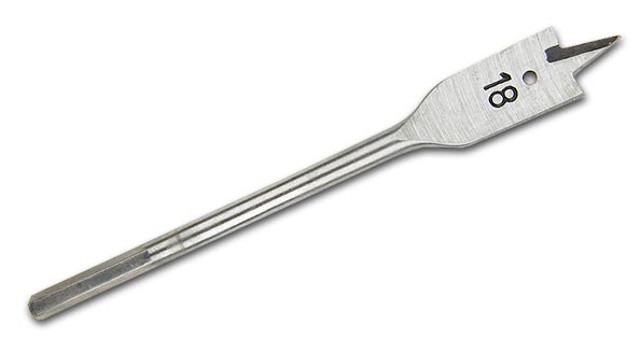
Spade
Spade bits have a simple design intended to rip quick holes through wood and other soft material. The spade up in the centre helps to keep the bit on target, but it;’s the nature of these bits to splinter out the back side of the hole when they go through. They do, however, require more torque than your ordinary twist bit.
Their simple construction means they’re easy to sharpen and costs a little less than other bits. They’re readily available in lengths of at least a foot. Long bits are handy for drilling deep holes or in hard to reach places. Many spade bits have a hole near the tip to pull wire back through the hole after drilling through floors and walls.
Pros:
- Quickly cuts through soft wood.
- Cheap.
Cons:
- Only really useful on soft woods.
- Leaves a ragged hole.
- Hard to start an angled hole.
- Lack of fluted mean deep holes can easily fill with chaff.
Used for:
- Rough construction.
- Making holes in studs, joists and walls to run cables.
- For making quick holes in wood with no clean appearance.
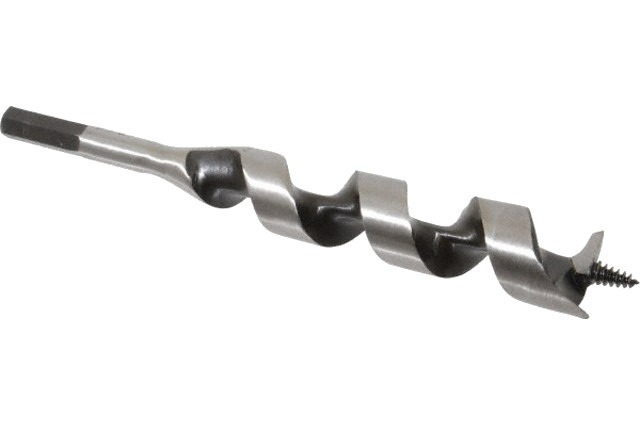
Auger
Augers are similar to twist bits, but they have a large single flute to remove chips and a screw tip to help it get started and stay centred.
They actually have a lot in common with spade bits. These bits are made for wood and other soft materials. They can readily be sharpened, and are usually long. Unlike spade bits, however, they leave neater holes and require less torque to turn. Due to their large flute, they’re better at drilling deep holes and removing the waste material. These improvements make them more expensive than spade bits of the same size.
Pros:
- Better at removing waste from a hole than a twist bit.
- Smoother holes.
- Less blowout than a spade tip.
Cons:
- Limited to soft materials and holes 1/4″ to 1-1/2″ in diameter.
Used for:
- Drilling medium sized and/or deep holes in wood.
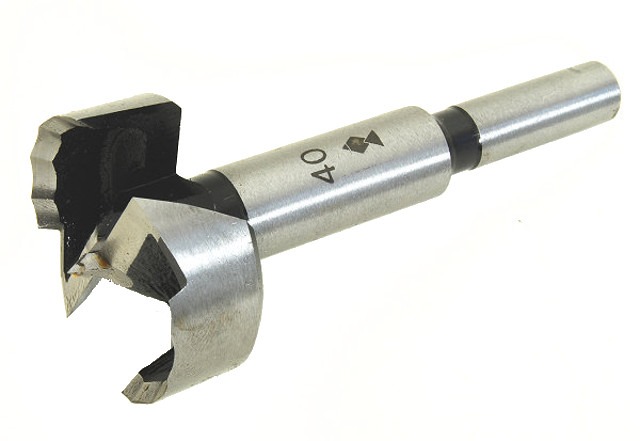
Forstner
Forstner bits are flat bottomed with a point in the centre to keep it on target. They tend to be expensive, but provide high precision and the finish finish of any drill bit. Unlike most bits which simply have a cutting edge on the bottom, Forstner bits cut two ways at once. First a blade around the outside keeps the hole from splintering, then a set of blades parallel to the surface shave off the material a they’re pressed into it.
Due the their ability to cut holes with extremely smooth sides and flat bottoms, it makes them attractive for many woodworking projects.
Pros:
- Flat bottom holes.
- Smooth-walled cuts.
- Sizes from 1/4″ to 3″.
Cons
- Limited to wood and similar soft materials.
- Larger bits require a drill press.
- Expensive.
Used for:
- Wood working projects that needs visible holes.
- Where precise, large, or flat bottom holes are necessary.
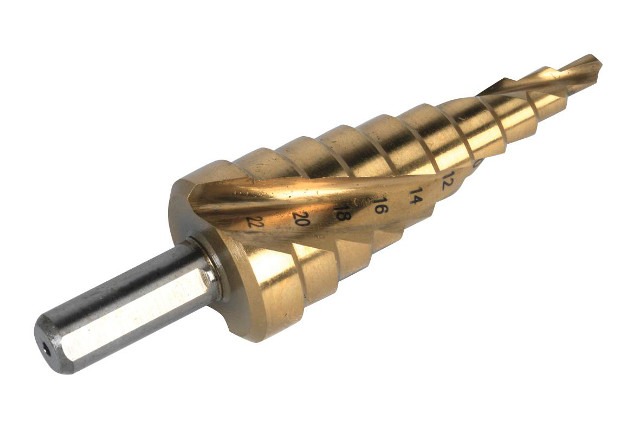
Step drill
These drill bits get their name from their stair-stepped profile. They tend to be expensive, but a single bit can cut many different sized holes. The deeper you drill the bigger hole you get. They’re typically labelled by the minimum and maximum size of holes they can cut, and the increment between the steps. (i.e.: “1/4in to 1-3/8in with 1/8in increments”). The size of the hole is typically inside the flute at each step.
They’re peerless for drilling precise holes in sheet metal. The straight flute prevents the bit from deforming the metal as it cuts through. They’re accurate and quick, allowing you to drill many different size holes without changing a bit, and by lowering the bit to touch the beginning of the next step you can easily produce a perfectly smooth hole.
The most obvious limitation of step bits is that they only work on material thinner than the individual steps on the bit, usually 3/16″ or so. That limits it to sheet metal, plastics, and laminates. The bits are also difficult to sharpen and the smaller sizes (lower steps) of the bit will go dull before the larger sizes further up.
Some step bits have a blunt end and require you to drill a pilot hole the size of the first step before you can use it. When cutting metal be sure to use cutting fluid to extend the life of the bit.
Pros:
- One bit cuts many sizes of holes.
- Clean, precise cuts.
Cons:
- Only for thin material.
- Difficult to sharpen without ruining the accuracy of the bit.
Use for:
- Cutting neat holes in thin sheet material, aluminium, plywood, and linoleum.
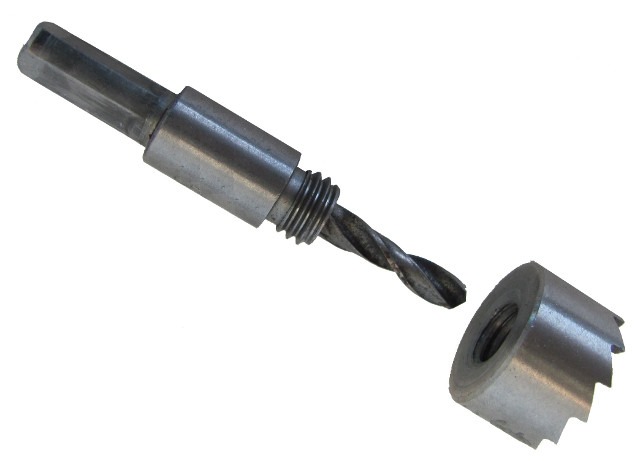
Hole saws
These are literally a saw blade bent into a circle, with a twist bit in the middle to help keep it centred. Unlike other bits they don’t chip away the material, they only cut around the outside, leaving a plug of solid material in the centre. Since they’re not removing as much material they don’t need as much pressure as a Forstner bit the same size. They cut neat holes with minimal splintering on the back. For very clean back sides, stop cutting when the pilot bit comes through the back, then move the drill to the back side and finish the cut from there.
Hole saws have a removable mandril that includes a twist bit, the shank that fits into the drill, and an attachment point for the outer saw. This lets different sized hole saws to be easily and cheaply swapped out and dull ones replaced. They’re commonly available in sides from 1/2″ to 6″ diameter.
Drilling a pilot hole the same size as the mandrel bit can help keep it under control, and it’s important to keep the bit parallel to the surface. Bimetal blades can even be used to cut soft metals up to about 1/4″ thick, and diamond grit saws can cut masonry.
Pros:
- Can cut large precise circles with minimal effort.
Cons:
- Have to cut all the way through the material to get a hole.
- Limited to thinner materials.
- Plugs often get stuck inside the bit.
Use for:
- Making holes in doors for locks.
- Cutting holes in drywall for lights or other installations.
- Making holes in joists for plumbing.